| |
home >> Data Recovery >>
Android enable mass storage
How to show android phones and tablet devices as drive letter in Computers, enable debugging mode on android devices

How to enable mass storage on android phones and tablet devices
You may accidentally deleted photos videos and other files from android phones like samsung galaxy, LG Optimus, HTC One, Sony Xperia, Motorola droid, or android talbet devices, and need to recover deleted files from the android device. However, the android phone or tablet does not detected by photo recovery software and data recovery program.
In this artilce, we will discuss some possible ways to enable mass storage device in android phone and tablet device, so that file recovery program can detect the android device.
Method 1. Check the settings in android devices to enable mass storage
In android device, go to: Settings -> Wireless & Wifi -> USB Tools -> Connec USB mass storage to PC.
Method 2. If above settings not exist, or android phone (or tablet device) does not shown as a drive letter in Windows computer.
Try enable debugging mode first
1) For Android 2.3 or earlier: Enter "Settings" > Click "Applications" > Click "Development" > Check "USB debugging"
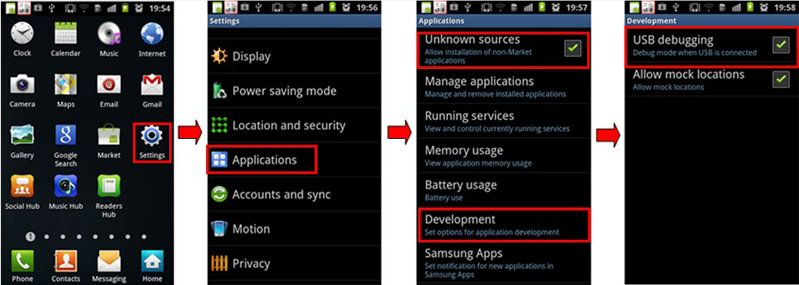
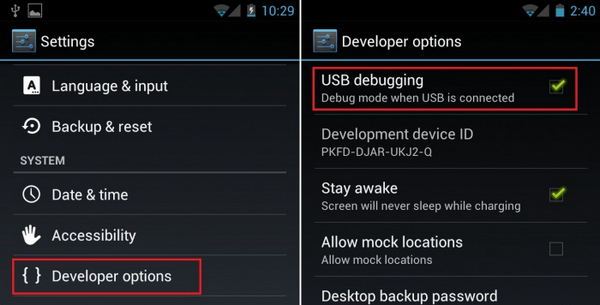
2) For Android 3.0 to 4.1: Enter "Settings" > Click "Developer options" > Check "USB debugging"
3) For Android 4.2 or newer (e.g. Android 5.0 Lollipop):
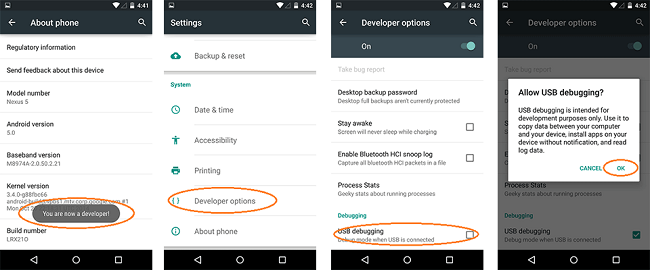
Enter "Settings" > Click "About Phone" > Quickly Tap "Build number" for several times (some people say 7 times) until getting a note "You are under developer mode"
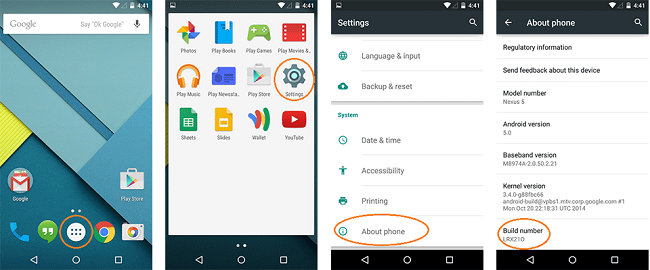
> Back to "Settings" > Click "Developer options" > Check "USB debugging".
Method 3. Still have problem, try to use some andorid app, detail here.
Related articles:
Andorid data recovery
Samsung photo recovery
Recover deleted photos from android
Still have problem, try a more complicated method which requires root.
The Requirements
1. A rooted Android phone, (try to root with a non-destructive method as this appears to protect those who must root from wiping the device data a second time),
2. BusyBox installed on your device,
3. Cygwin installed to [c:\cygwin] with pv and util-linux from the repo. Make sure to open Cygwin once to make sure that the /bin folder is created. Also, I made a folder at [c:\cygwin\nexus] to put the exported .RAW file,
4. Netcat (download the ZIP file and extract nc.exe to [c:\cygwin\bin]),
5. ADB (make sure adb.exe is in your path),
6. USB Debugging enabled on your device,
7. VHD tool from the mighty M$. Put the VhdTool.exe file in [c:\cygwin\nexus]
The Work
1. Turn on your phone
2. Connect the phone in ADB mode
3. Unlock the screen.
4. Open a Cygwin terminal and enter (This assumes your BusyBox installation is at [/system/bin/busybox]. It may be at [/system/xbin/busybox]):
adb forward tcp:5555 tcp:5555

adb shell

su

/system/bin/busybox nc -l -p 5555 -e /system/bin/busybox dd if=/dev/block/mmcblk0p12
5. Open another Cygwin terminal and enter:
adb forward tcp:5555 tcp:5555

cd /nexus

nc 127.0.0.1 5555 | pv -i 0.5 > mmcblk0p12.raw
6. Run around the house a few times. For 32GB internal memory this is going to take 3+ hours. That's a lot of running. When it's done...
7. We need to convert the .RAW file to a virtual hard drive. VhdTool.exe basically just puts a VHD footer on the end of the .RAW file. Open a Windows command prompt, go to [c:\cygwin\nexus], and type:
VhdTool.exe /convert mmcblk0p12.raw
8. Now we need to mount the VHD in Windows. Select the Start button-->right-click Computer-->select Manage.
9. Select Storage-->Disk Management.
10. In the menu select Action-->Attach VHD.
11. For Location enter [c:\cygwin\nexus\mmcblk0p12.raw] and select the OK button.
12. Right-click on the name (e.g. "Disk 1") to the left of the Unallocated space and select Initialize Disk.
13. Select the GPT (GUID Partition Table) radio button and select the OK button.
14. Right-click on the Unallocated space and select New Simple Volume...
15. In the Wizard select Next>, leave the default for the volume size, select Next>, select a drive letter (e.g. K), select Next>, MAKE SURE to select the 'Do not format this volume' radio button, select Next>, select Finish.
16. A box will pop up asking you to format the drive. You DO NOT want to format the drive at this time.
17. Right-click on the RAW space and select Format... MAKE SURE to change the File system to FAT32. Set the Allocation unit size dropdown to 'Default.' MAKE SURE that the Perform a quick format checkbox is CHECKED. You do not want to overwrite the entire new drive with all zeroes (0's) and destroy your data. Quick Format means that it will only attempt to destroy the index for the drive by establishing a new index. Without this box checked the Windows operating system will write zeroes (0's) across the entire volume, potentially destroying your data. Select the OK button.
18. A box will pop up saying that Formatting this volume will erase all data on it. That would be doubly true if you actually didn't check the 'Perform a quick format' checkbox. Double check that you actually did check the box and select the OK button. (Don't worry. This essentially leaves the volume in the exact same state that your phone's internal memory is living in right now: there is data on the drive...)
19. Open Asoftech Data Recovery application and select android phone drive letter, and then press Next button.
|
|